SWY's technical notes
Relevant mostly to OS X admins
PRTG and Meraki API Monitoring
Posted by on September 18, 2020
I recently stumbled upon a post in the Macadmins Slack, which inspired me to learn more about logging and graphing data in my PRTG instance from the Meraki API, storing all my visual history and alerts within PRTG.
Ground zero to use the Meraki API is to enable and generate the key, which Meraki documents better than I can. Remember to store the key securely, as this is a secret just like a user/password pair or private SSH key.
Once safely documented, we can use the key to pull back our Organization ID:
curl -L --request GET --url https://api.meraki.com/api/v1/organizations --header 'Content-Type: application/json' --header 'Accept: application/json' --header 'X-Cisco-Meraki-API-Key: <your-api-key>'
This will pull back 3 values in name:value format, comma separated. Note the “id” field. (Organization ID)
Then we take that ID over to https://developer.cisco.com/meraki/api-v1/#!get-organization-networks . Click the [Configuration] image, supply your API key there, and your Organization ID on the main page, and [Run]. Each network that your API key can access will be among the data returned, and each has a unique “id” field: this is the Network ID.
The final bit of information needed for a query is to specify what hardware is to be monitored. The device serial number can be sourced from the Meraki Dashboard, or via the API at https://developer.cisco.com/meraki/api-v1/#!get-organization-devices using the same organization ID found earlier.
With these facts documented from Meraki, we can create a new sensor in PRTG. Step 1 is to have a template for your REST sensor, which needs to reside in C:\Program Files (x86)\PRTG Network Monitor\Custom Sensors\rest\ within your PRTG server. Paessler has documentation on creating your custom REST sensors. The first sample template I worked with provides CPU monitoring, and is named meraki-mx-utilization.template
{
  "prtg": {
    "description" : {
      "device": "Meraki MX",
      "query": "/api/v0/networks/NETWORK_ID/devices/SERIAL_NUMBER/performance",
      "comment": "You need to replace NETWORK_ID and SERIAL_NUMBER"
    },
    "result": [
      {
        "channel": "Utilization" ,
        "unit": "Percent",
        "value": $.perfScore
      }
    ]
  }
}
This template was provided by Tyler Sparr in the #Meraki channel of Macadmins’ Slack.
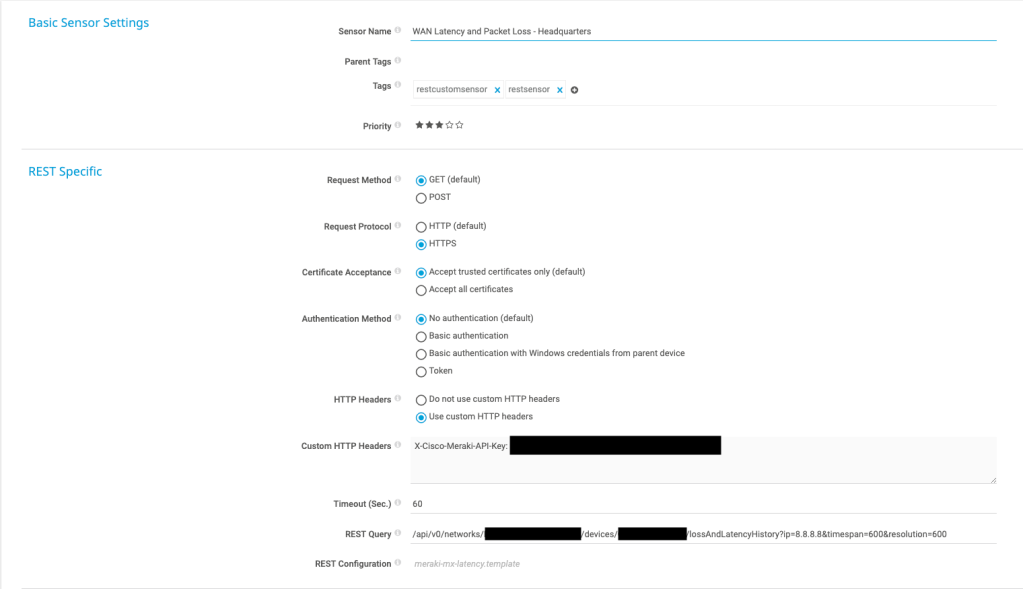
With the template in place in PRTG, we can then add a new sensor. I started by first creating a new device to store the sensors in, I named mine Meraki API Monitoring. Next, I added a new sensor of type REST Custom BETA. Fill it out to match the following:

The 3 redacted blocks are facts we pulled earlier:
-The API Key was the first step
-The 2nd redacted block is the Network ID
-The 3rd block is the Device Serial
The second template tracks loss and latency history in pinging the default server of 8.8.8.8 . If you’ve changed the destination to monitor, you’ll find that in Security & SD WAN: SD-WAN and Traffic Shaping: Uplink Statistics.
{
  "prtg": {
    "description" : {
      "device": "Meraki MX",
      "query": "/api/v0/networks/NETWORK_ID/devices/SERIAL_NUMBER/lossAndLatencyHistory?ip=8.8.8.8×pan=600&resolution=600",
      "comment": "You need to replace NETWORK_ID and SERIAL_NUMBER"
    },
    "result": [
      {
        "channel": "Loss Percent" ,
        "unit": "Percent",
        "float": 1,
        "decimalmode": 2,
        "value": number($[0]["lossPercent"])
      },
      {
        "channel": "Latency",
        "unit": "Msec",
        "float": 1,
        "decimalmode": 2,
        "value": number($[0]["latencyMs"])
      }
    ]
  }
}
Which would pair with a PRTG sensor that looks like this:
To get the latency numbers to show up exactly as expected, I needed to do a little customization within the Channel Settings: tweaking the Unit value to ms instead of # , and locking the Decimal Places to a value of 1. Sometimes the many hour averaging was reporting all the decimals- harmless, but not pretty to look at.
Spurious “you don’t have permission to use the application” errors
Posted by on February 1, 2019
For far too long, I’ve been irritated with these digital rocks in my shoes, which would appear on wake from sleep, telling me I didn’t have permission for a wide variety of executables:


If you tried either kind of allow, you’d end up at an administrator credential request for Parental Controls. Except this was going on with company owned machines- there were no Parental Controls in place, so things didn’t add up.
Thankfully, my friend Stephen Boyle answered my Slack query: check for an application restriction profile, and pull it. Sure enough, I had a profile to prevent my users from attempting to install High Sierra. After pulling that profile, the rocks are out of my shoes.
A better way to update a DeployStudio .nbi
Posted by on July 22, 2017
Earlier this week, my employer bought our first 2017 iMac, and the first new Apple hardware we’d purchased in quite some time. My normal workflow is to boot a new machine to DeployStudio, where I do just a few tasks, such as machine naming, installing munki, installing a default manifest, and telling it to look for software on first boot.
I did a presentation about this a few years ago.
Since I hadn’t updated my DeployStudio netboot image in a while, I wasn’t shocked when the brand new hardware couldn’t be booted from a 10.12.2 image- the hardware is newer than that OS release, AND Apple has been doing forked builds for 2017 gear- OS releases tweaked for that hardware, instead of 1 Image to Rule Them All. The result of trying to netboot the iMac from the older image is the “circle-slash” logo that means “not gonna happen”.
Fortunately, this turned out to be the day that 10.12.6 dropped. Hoping that this would be a unified build, I updated my mac mini DS/Autopkg/other duties as assigned server to 10.12.6, to using the boot volume to generate a new DS .nbi. When starting to make the image, I received the DS warning that the boot OS and recovery partition OS don’t match, and that this could be a problem. This is expected behavior, as OS updates don’t bump up the version of the OS on the recovery partition. I decided to roll the dice, and try making the DS netboot image despite the error.
When trying to boot from this one, the iMac got as far as showing the apple logo, but never a progress bar. The DS OS version mismatch warning was a valid heads up.
My next effort was to get the recovery partition of my mini updated to 10.12.6. After getting in a fight with Create Recovery Partition Installer and discussing my experiences with the #deploystudio channel in the macadmins Slack, user maurits shared a great idea:
@swy: you try to create a 10.12.6 DSR .nbi? My tip: create an image using AutoDMG from the fresh Install macOS 10.12.6 app, mount this image, and use that as source for creating the .nbi . On the image (and thus on the mounted volume) there is a fresh 10.12.6 Recovery HD partition. Using updates, the Recovery is usually not updated.
https://macadmins.slack.com/archives/C056NV03Z/p1500505739056491
This was great advice I wanted others to see. If you wish to create the latest DeployStudio Runtime netboot image, get the latest Install macOS.app and AutoDMG. Build a disk image, mount that image, and when you make the DS .nbi, choose the mounted disk to generate the NetBoot image from.
This worked perfectly, and I was able to netboot the iMac, install the basics, and have munki do the rest of the configuration automatically.
A fix for high idle CPU use in Outlook 2016 15.28
Posted by on December 2, 2016
I recently noticed a displeasing behavior of Outlook 2016: while idle, in the background, it was taking up an unacceptable amount of CPU time:
I started digging around the #microsoft-office channel in the MacAdmins slack team, and was provided with this workaround that has solved it in every situation we’ve tried:
- Start a new email
- Click on the Options tab
- Click Language
- At the bottom, there’s an option for “detect language automatically”. Uncheck this option.
I can only see a downside to this if you compose in multiple languages.
Credit to macadmin Michael Clark from Cisco for first posting this fix in Slack, and Paul Bernicchi for seeing my query and pointing this out.
Update 1: @mrexchange tells us we can expect to see this fixed soon- here’s the schedule for when it will hit the 3 tiers of Office releases:
just to confirm, the Outlook CPU issue is currently present in all channels. Here’s the schedule for when you’ll see it fixed:
Insider Fast – 15.30 on 12/7
Insider Slow – 15.29 on 12/5
Production – 15.29 on 12/13
Mounting a Synology SMB share as a local account
Posted by on July 29, 2016
Earlier this month, I moved my munki repository from my Mac Mini server to web services on a Synology rackstation. My biggest reason is for redundancy: the Syno has networking, power and drive failure redundancies beyond what a Mac Mini can provide. However, one service that a Synology cannot provide is autopkg, which requires a Mac- therefore, the mini still has a use.
In order for the autopkg output to be directed into the Synology munki server, I configured the MUNKI_REPO string to point to the SMB mounted path: /Volumes/Synologyserver/munki/path . To authenticate to that path, I made a local account on the NAS that the Mini would authenticate with. Unfortunately, when I first tried to mount the path via the Finder, I could not authenticate properly- all efforts were rejected as invalid attempts, despite my most carefully audited text entry.
Eventually I realized the issue: the Synology was only searching the directory structure of the AD domain it was bound to, and was not looking at local accounts to validate the SMB connection. In order to make it look at the local account, I needed to authenticate to the SMB share in the following format:
smb://.\localaccountname:*@server.tld
With the login in that format, the .\ indicates “use local directory, not a directory service”, and :* indicates “bring up the SMB server login window”.
Providing Snipe-IT via Docker
Posted by on May 24, 2016
The goal of this post is to walk through all the steps needed to take a stranger to Docker from ground zero to a working install of Snipe-IT asset manager in a Docker container, linked to a mysql Docker container, storing data on the host volume, where the host is a Synology NAS. We’ll start with a presumption that the reader knows why Docker exists and what containers are, but doesn’t have a familiarity with how to make Docker work for them.
My workplace needed a better (read: any) asset tracking system, and the venerable Snipe-IT came across my radar as a suitable choice to explore for multiple reasons:
- It’s FOSS
- There’s a Docker instance, and I wish to up my Docker game
- I found other macadmins who use it
- @snipeyhead and @uberbrady are smart devs
- The online demo didn’t invoke rage, it felt like something we could use.
Unfortunately, like many online docs, Snipe-IT’s documentation makes some presumptions that the reader has a working familiarity with making containers, linking them, and knowing why they would want to store data on the host filesystem vs a container. When you’re taking your first walk down this road, the path is not always obvious: I hope to illustrate it with what I learned.
When we start with Snipe-IT’s Docker docs, it starts with the basic: “pull our container from Docker Hub”. This is definitely what you want. But not where you want to start: this is a cart in front of a horse. Before we’re ready for a Snipe-IT container, we need to prepare a mysql container. But before that, let’s get our Synology ready to do awesome Docker stuff.
To do that, log into the DSM web interface on your Synology, click the Main Menu, and head to the Package Center:

Installing Docker is a one click event, and is now available from the Main Menu. Start it up.
Synology’s “Docker Registry” is the desired path to get a pre-built container. We’ll use the registry search tool to find mysql. It’s the ribbon-wearing “Official Image” that you wish to download: you can select the version via the “Choose Tag” request that comes after clicking the [download] button:
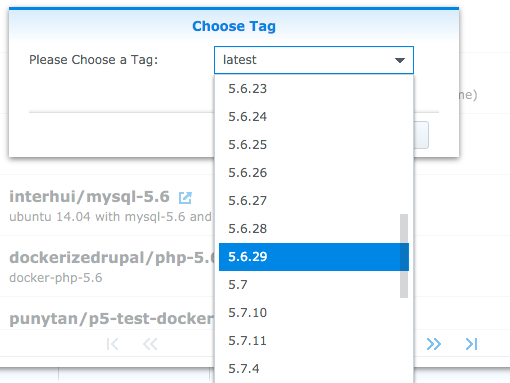
mysql:5.6.29 should now be an option under the Image tab. We are selecting 5.6.29 per the Snipe-it documentation guidelines regarding 5.7 defaulting to strict-mode, and skipping the requirement to disable strict-mode.
Before we get this image running in a container, we’re at a decision point. Docker images are designed to be non-persistent. This aspect is great for updating to the latest image, but “non-persistent” is not a good feature in your asset tracking software database. There are 2 options for getting the needed persistence:
- Make another “data-only” container. Pros: containers are easy to relocate. Cons: you need backups. You’re going to need yet another container to perform backups and restores.
- Map a path from the mysql container out to the local storage. Pros: can use Synology built-in tools to back this data up. Cons: less easy to relocate… but not all that hard. Still, you’re not fully conforming to the “container all the things!” viewpoint. Like most decisions in life, neither is purely right or wrong.
I don’t intend to be shipping these containers around at all, and expect that once established, my asset tracking software will stay where it is for the functional life of the NAS. So for my needs, I’m going with host-based storage.
To start up our Dockerized instance of mysql, Launch that image from the Launch button. The naming is arbitrary (snipe-mysql is logical), and no changes are needed to the port settings: the default of Local as auto mapped to 3306 is appropriate.
Step 2 is all optional. I haven’t found a need to limit CPU use to make sure it’s a well behaved neighbor to other services, it’s a pretty low-impact service.
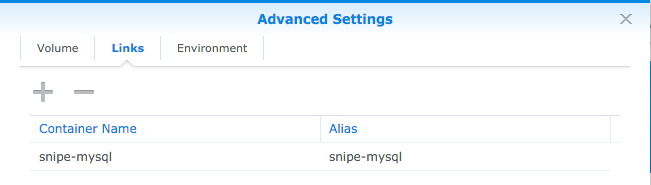
On the summary page, click Advanced Settings. Here’s where we can set more options, such as where to store data. From volume choose Add Folder, I put mine in the docker directory, and called it snipe-it_mysql. With this mounted at /var/lib/mysql, mysql data will now be written out to the host storage instead of being put in the container. Uncheck Read-Only: we better be able to write here.
Links will not be needed: the Snipe-IT container will link TO this container. If we’d chosen to go with a data storage container, we’d link to it here.
Environment is where we put the rest of the commands. These are taken from the Snipe-IT documentation (Substituting your own password values is encouraged.)
Click OK and start up the container. By clicking Details, you should be able to see the one process running, and consult the log. If all has worked as intended, your log will end with mysqld: ready for connections, and under File Station/docker/snipe-it_mysql, you’ll see some newly created data: the database that containerized mysql is reading and writing.
So it’s time to connect something to it. Back to the Docker registry to download snipe/snipe-it.
Start it up from the wizard under Image. Port 80 is already in use on the NAS, so we can direct a different port into 80 in the container.
Again head to advanced, and link the container to snipe-mysql. Keep the Alias named mysql:

The environment variables are from the SnipeIT documentation, moved from the .env file to the Environment Variables section: If you don’t list SERVER_URL with port 8088, then the dashboard link will fail. There’s no rule that you have to use 8088, it can be any high port that appeals to you- it just has to match the Local Port value back on step 1 of this section.

After starting up the snipeit container, I found that when I pointed the browser at the SnipeIT instance, I got this:

Turns out, that’s expected. As we read the fine manual, we see that we’re supposed to execute docker exec -i -t snipeit php artisan app:install in our container to get things started. At first, I thought I’d get away with that in the “Execution Command” field of the window 2 pics above. No, it’s interactive: it supplies questions to be answered by a human . This step requires interacting in the Docker container. To do that:
- SSH into the Synology as a local account with admin abilities. sudo -i to become root, authenticating with the local administrator’s password.
- Execute docker exec -i -t snipeit php artisan app:install . This sends the command “php artisan app:install” to the docker container, and drops the user into the container to interact. This script sets up the first user account: use the username and pass defined in the SQL container’s MYSQL_USER and MYSQL_PASSWORD environment variables, and soon after a number of tables are logged as “migrated”, one can point their browser to the SERVER_URL above to start exploring the new web service on the NAS.
With that, you should have a working Snipe-IT install. Because this project is frequently updated, you’ll periodically want to grab the current release of SnipeIT from Docker hub, to get the latest fixes and enhancements. To do so:
- Head into your Synology’s Docker management interface, and stop the SnipeIT container, then the Snipe-mysql container.
- Go to the Registry tab, and search for snipe-it. Double-click the same official snipe/snipe-it container you used before. This will update your container to the latest release (equivalent of a ‘docker pull’ command). Once updated, start the SQL container first, then the SnipeIT, and you’re current. Unfortunately, via the GUI, this is an obscure process: it lacks feedback if anything is going on. If you want to see what’s going on, SSH to the Syno and sudo -i as documented above, and run docker pull snipe/snipe-it.
- Start up your updated Docker instance just like before. While things might vary on what the requirements are on future updates, you should expect to need to do some database migrating to match updates. This is probably easiest if you gain shell access to the Docker instance: docker exec -i -t snipeit /bin/bash
- Execute only the php artisan commands documented in the Snipe-IT upgrade documentation– the Docker container has handled the composer install for you
php artisan migrate
php artisan config:clear
php artisan config:cache
- Execute only the php artisan commands documented in the Snipe-IT upgrade documentation– the Docker container has handled the composer install for you
If you’re going to open this service to the WAN, you’ll naturally want to require SSL on it, which is not covered here. If you’re standing up instances of FOSS software via Docker on a NAS, I’m giving you credit for knowing why that’s important.
In regret of Auto-VoIP
Posted by on May 20, 2016
Due to a remodeling project at work, it came to be that I needed to provide temporary Ethernet drops to a lot of areas that weren’t designed to have a human and a VoIP phone sitting there. To make this happen, we added 8 Netgear GSTP110TP switches to our network- PoE, managed, endorsed by a friend, and not expensive- as these are a temporary fix, not years of infrastructure to rely on. Configuration was not complicated: each of these had to handle just the main wired client vLAN and the VoIP vLAN, so the task list boiled down to
- Bring firmware current (who wants to troubleshoot something potentially fixed in last week’s update?)
- Add the OUI for our Polycom phones, since that was not a vendor it recognized out of the box
- Enable LLDP on ports 2-8 (1 was declared to be the uplink to the core stack)
- Add vLANS to the switch, using the Voice VLAN option to match our VoIP vLAN and apply to all ports.
Soon we had streams of Cat5e running in all sorts of ways that would make any self-respecting admin hang his head in shame.

You don’t really want to do this.

Or this
During the setup, one other option caught my eye: “auto-VoIP”. Per the Netgear documentation:
The Auto-VoIP automatically makes sure that time-sensitive voice traffic is given priority over data traffic on ports that have this feature enabled. Auto-VoIP checks for packets carrying the following VoIP protocols:
• Session Initiation Protocol (SIP)
• H.323
• Signalling Connection Control Part (SCCP)
• Media Gateway Control Protocol (MGCP)
Reading this, it sounded like a fine idea to enable this option, and that was done. With the above configuration set, we started testing switches and plugging phones in, and all worked as expected. LLDP allowed the switches and phones to establish that there was a device with a qualifying OUI attached to a port, and therefore put its traffic in the voice vLAN, and despite being a cabling mess, all seemed well with the world.
Then the tickets started trickling in- only from staff using phones attached to the Netgears:
- Lost audio in one direction while on a call (call stays connected, voice transit suddenly became ONE direction only)
- No dialtone
- url calling disabled shown on the Polycom screen
- More one-way audio issues
The events were unlike any other networking oddities I’ve tackled: sometimes they’d be magically fixed before my fellow IT staff or I could get down to witness them. We configured our PRTG monitoring to scan the VoIP subnet and start tracking if phones were pingable or not, and we ended up with 2 day graphs that showed that at approximately 24 hour-ish intervals, we’d loose connectivity with phones, in clusters, all members of the same Netgear. They didn’t all go offline at the same moment, but a wave of failure would wash over the group: it might loose G2 at 2P, G3 at 2:04, G5 at 2:07, then G3 would work again, G4 would drop pings, G2 would start working… no pattern that we could see, just a wave of “nope, no traffic going to/from that phone” ranging from 2 to 20+ minutes, that would eventually resolve without our input. Naturally, this never happened in the dark of night: there was the 2P cluster, the 3:45P cluster, and the 6P cluster.
With some guidance from our VoIP provider, we finally determined the culprit: Auto-VoIP. While this might help improve the experience in high-traffic conditions where the voice device isn’t in a prioritized vLAN of its own (such as a small deployment, where this 8 port switch is the only switch), it’s not a benefit when there’s a dedicated voice vLAN that has its own prioritization rules. Not only “not a benefit”, but enabling it caused one of the most unique network issues I’ve ever met. Since disabling auto-VoIP on all ports, this issue has not returned.
Synology DSM 6, indexing and Advanced Permissions
Posted by on April 28, 2016
A common question in my office has been “Why can’t we search the file server with Spotlight?” Since our migration to a Synology for AFP/SMB services I had no good solution to offer to this query, so I was very pleased to see this as a feature in DSM6- see “Mac Finder Integration” on their File Sharing & Management page. To test this, I first upgraded our secondary Synology to DSM 6- it contains a nightly rsync clone of the production NAS for on-site DR needs (among other uses). The upgrade was simple and uneventful.
After it rebooted, I found my way to the new “Indexing Service” Control Panel, which contains a “File Indexing” tab, where one can add the folder to index via the [Indexed Folder List]:
To my surprise, when I tried to “create” a new indexed folder (their vocabulary that also includes “add existing folder”), my rsync clone of our main production share wasn’t on the list. Many other folders were, but not the one most relevant to solving a problem for us.
Through a call to Synology support, it was determined that if a Shared Folder has “Advanced Share Permissions” enabled, if the current GUI user isn’t listed with read/write permissions on that folder, the ability to index that folder is not provided. When those permissions were expanded to give the GUI login read/write, the ability to index became available. The conclusion is that the index is made with the permissions of that GUI user, and is One Index to Rule Them All: meaning that depending on a user’s folder permissions, a Spotlight search on the server might offer up content that the authenticated user is not allowed to access.
As I publish this, the indexing service is still churning away, and not yet available for testing. With multiple TB being indexed by 1Gig RAM and an Atom processor, my 1812+ might be working on this task for a good long while. However, others have blogged that Spotlight searching on 7TB of data on a Synology happens in a few seconds, so my expectations have been set.
Migration Assistant crash to loginwindow in 10.11
Posted by on November 25, 2015
Earlier this week, my co-worker started on a routine user migration from computer.old running 10.9.5 to computer.new on 10.11.1. He booted .old to Target Disk Mode, attached to .new over thunderbolt, and started up Migration Assistant. To his surprise, after authenticating within MA, instead of inquiring “where is our migration source?” the computer exited to loginwindow. We confirmed that this condition was repeatable under multiple circumstances.
We brought our unexpected behavior to the macadmins Slack community, where collaboration in the #osx channel with others who had seen this helped narrow the circumstances down to Profile options configured at loginwindow. Specifically, this unwanted behavior can be induced by enabling Disable Automatic Login in the Login Window section of the Profile. This has been set in our default Profile for many OS X releases, but has now become a problem.
If the Profile is removed, or updated with a version that does not have Disable Automatic Login enabled, Migration Assistant proceeds as expected.
I’ve filed this as Apple Bug #23664591, trackable at openradar.appspot.com.
VPN Profiles at loginwindow under Yosemite
Posted by on August 21, 2015
Unlike 10.9, Mac OS 10.10 has an unfortunate behavior regarding installing a Profile that configures a VPN while at loginwindow: it doesn’t work. I’m not the first to find this, it was documented on munki-dev in October 2014. I became aware of this when I ran my first out of box configuration after producing a working Profile and postinstall script for my SonicWall Mobile Connect VPN client, when the profile that had installed perfectly at testing via MSC, but looped endlessly at the end of the firstboot process.
To address this problem, it takes 3 steps:
- Augment munki’s conditional items with a custom condition
- Deploy that script to every client
- Add that check to the pkginfo
The first involves adding a script to /usr/local/munki/conditions – any and all scripts that exist in that directory are executed in every munki run. For this goal, we need a script that determines if there’s currently a user logged in. If there is, the install should happen, and if not, don’t try. Fortunately, this script had already been done and blogged by Patrick Fergus, and was the perfect starting point. When run, (at every munki run), if a user isn’t logged in, it writes a key of false to /Library/Managed Installs/Conditional Items.plist, and true if they are.
#!/bin/bash

plistLocation=/Library/Managed\ Installs/ConditionalItems

#Verify a user is logged in
loggedInUser=`python -c 'from SystemConfiguration import SCDynamicStoreCopyConsoleUser; import sys; username = (SCDynamicStoreCopyConsoleUser(None, None, None) or [None])[0]; username = [username,""][username in [u"loginwindow", None, u""]]; sys.stdout.write(username + "\n");'`

if [ ! -z "${loggedInUser}" ]
then
  defaults write "${plistLocation}" isUserLoggedIn -bool true
else
  defaults write "${plistLocation}" isUserLoggedIn -bool false
fi
With that script written, the next step was to get every munki client to have it. My preferred route to this is via The Luggage, but with an addition: Mike Solin pointed me to a very useful bit of code to drop into /usr/local/share/luggage/luggage.local, which makes it quite easy to pack up both Munki conditional items and Outset scripts. With that added to luggage.local, I could make the following Luggage makefile:
USE_PKGBUILD=1
include /usr/local/share/luggage/luggage.make
TITLE=isUserLoggedInCondition
REVERSE_DOMAIN=com.hiebing
PAYLOAD=\
 pack-usr-local-munki-conditions-isUserLoggedIn.sh
With that makefile and the isUserLoggedIn.sh script in the same folder, a run of make pkg builds a package to be munkimported. After distributing that package to all the machines I manage, it was a small matter of adding the following to the Profile installer’s pkginfo:
<key>installable_condition</key>
<string>isUserLoggedIn == TRUE</string>
With these parts, every time munki runs, it runs the above Python to ask if there’s a currently logged in user or not. If yes, then it writes the key above to the Conditional Items.plist . The installable_condition must match for the install to continue. Therefore, when it first tries to run at loginwindow, Python has written the false key, the installable_condition isn’t met, and the endless cycle at loginwindow is avoided. managedsoftwareupdate will soon do a background run while the user is logged in, and will then invisibly install the profile, and we have a configured VPN.
